
How to Deploy/Migrate Web Apps to AWS EC2
This post is also published on the Medium publication Better Programming. See my post there.
Move your apps from Heroku by setting up a continuous deployment workflow for your Python and PHP web apps
Heroku is deprecating its free tiers for deploying web apps by Nov 28, 2022. If you have many low-traffic portfolio projects like I do, hosting them all on one VPS is cheaper than paying on a per-app basis for a PaaS solution like AWS Elastic Beanstalk or DigitalOcean’s App Platform.
If you are deploying your Flask or Django web application for the first time, without having used Heroku before, this post will help you deploy your applications as well.
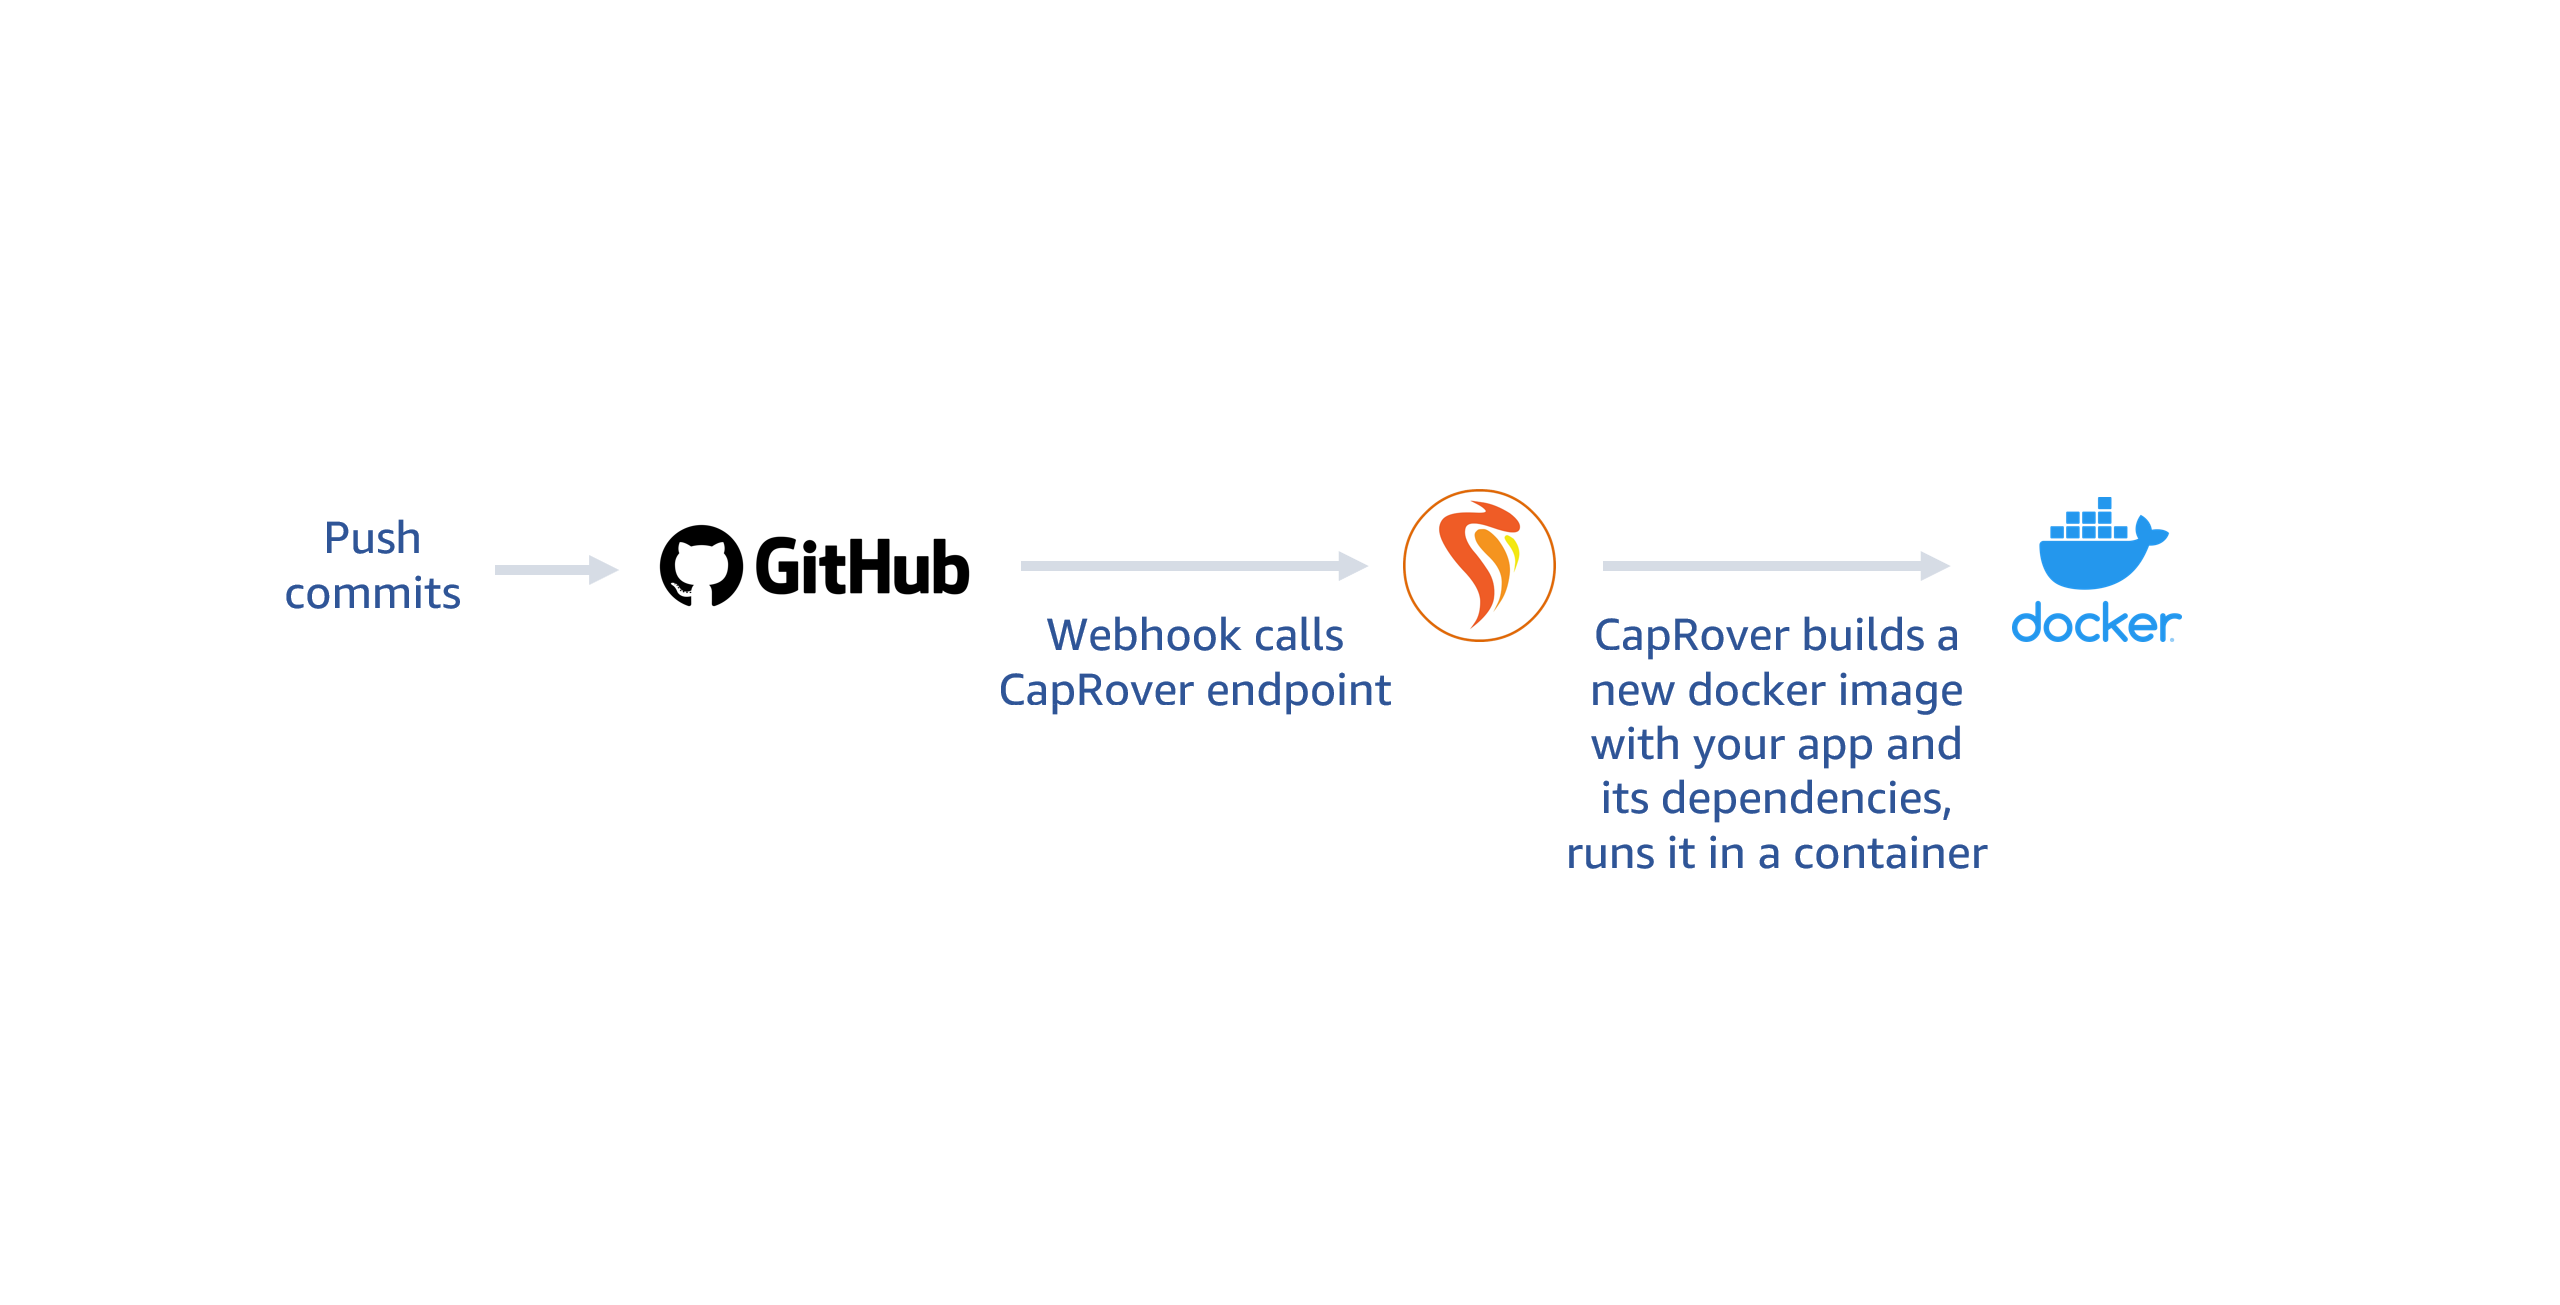
After following this tutorial, as you push your commits to GitHub, your VPS will create a new Docker image, install the dependencies of your app in it, then run that container by itself; and you’ll be able to monitor all this from your browser.

Table of Contents
- Launch & Configure an AWS EC2 Instance
1.1. Attach the EBS Volume
1.2. Automount the Storage Volume After Reboot
1.3. Set Inbound Rules on the AWS Dashboard to Open Ports - Install & Configure Docker
2.1. Installation
2.2. Add Your User to the Docker Group
2.3. Make Docker Use the Attached Volume - Install & Configure CapRover
3.1. Configure the DNS Records
3.2. Install CapRover
3.3. Configure CapRover
3.4. Install Your First App - Move Your App from Heroku to the New Server
4.1. Create a GitHub Repo (if one doesn’t exist)
4.2. Dockerize Your Python Application
4.3. Create a New Application on CapRover
4.4. Setting Up the Continuous Deployment Workflow - Migrating a PostgreSQL Database
5.1. Export from Heroku
5.2. Migrate the Database - Extra
6.1. What about PHP applications?
6.2. What if my app is not “stateless”?
1. Launch & Configure an AWS EC2 Instance
We’ll start by creating an EC2 instance on the AWS dashboard. You can follow a guide like this one if you need. For my needs, I chose an Ubuntu 22.04 on a t2.micro and added a second Elastic Block Storage (EBS) Volume of 20 GB capacity.
1.1. Attach the EBS Volume
Once you ssh into your server, list all partitions with the following command.
lsblk -o NAME,FSTYPE,LABEL,SIZE,MOUNTPOINT

Based on the output above, we want to mount the 20GB volume named xvdb; but we do not see an FSTYPE under xvdb, as we do with xvda, meaning this is an empty volume. So we will first create a file system on it.
sudo mkfs -t xfs /dev/xvdb
Then, let’s create a mount point:
sudo mkdir /mnt/ebs1
Now we can mount the EBS volume to this directory as below. Note that we’ve added “/dev/” before the volume name from above.
sudo mount -t auto -v /dev/xvdb /mnt/ebs1
Now if we run the following again,
lsblk -o NAME,FSTYPE,LABEL,SIZE,MOUNTPOINT
we see that the EBS volume is mounted to /mnt/ebs1.

1.2. Automount the Storage Volume After Reboot
The EBS volume will not remain mounted after reboot unless we set it to automount. We can do so by editing /etc/fstab.
sudo nano -w /etc/fstab
Append the following line after replacing the mount point and the file system type with what you saw earlier with the lsblk command.
/dev/xvdb /mnt/ebs1 xfs defaults 0 2
Important: If you have an invalid configuration in fstab, your server will become unbootable! Validate these settings before rebooting with the command below.
sudo findmnt --verify
If you do not see a success message, check your /etc/fstab file for errors. Otherwise, you can reboot:
sudo reboot
… and see that your volume is mounted with:
lsblk -o NAME,FSTYPE,LABEL,SIZE,MOUNTPOINT
If you encounter any errors about your volume, see this AWS guide on EBS volumes.
1.3. Set Inbound Rules on the AWS Dashboard to Open Ports
Now, we need to open some ports by creating Inbound Rules. Select your EC2 instance ID on the AWS dashboard, select the Security tab, and click on the id of the security group. Then click on the “Edit inbound rules” button and add TCP rules for at least the ports 22, 80, 443, 3000, and 5432.

After CapRover setup, you may remove the TCP/3000 rule. If you plan to use apps that require other ports, you may add them here as well.
2. Install & Configure Docker
We will use CapRover, which is a Platform as a Service (Paas), to handle automatic deployment, Nginx configuration, and more. CapRover will use Docker containers to deploy your apps so we need to install Docker first.
2.1. Installation
First, run the following to update the apt package index and install packages to allow apt to use a repository over HTTPS:
sudo apt-get update
sudo apt-get install ca-certificates curl gnupg lsb-release
Then, add Docker’s official GPG key and set up the repository:
sudo mkdir -p /etc/apt/keyrings
curl -fsSL https://download.docker.com/linux/ubuntu/gpg | sudo gpg --dearmor -o /etc/apt/keyrings/docker.gpg
echo \
  "deb [arch=$(dpkg --print-architecture) signed-by=/etc/apt/keyrings/docker.gpg] https://download.docker.com/linux/ubuntu \
  $(lsb_release -cs) stable" | sudo tee /etc/apt/sources.list.d/docker.list > /dev/null
Now we can install the Docker Engine.
sudo apt-get update
sudo apt-get install docker-ce docker-ce-cli containerd.io docker-compose-plugin
If all went well, when you run the following command,
sudo docker run hello-world
… you should see the message below:

See this guide, if you encounter any errors.
2.2. Add Your User to the Docker Group
If you want to save yourself from having to type sudo before every docker command, run the following command to add your system user to the docker group and activate the changes to groups. Replace ubuntu with your username, if needed.
sudo usermod -aG docker ubuntu
newgrp docker
2.3. Make Docker Use the Attached Volume
If you want to have the docker images kept in the mounted volume, run the following command.
sudo mkdir -p /etc/systemd/system/docker.service.d
sudo nano /etc/systemd/system/docker.service.d/docker-storage.conf
Then place the following after updating “/mnt/ebs1” with the path you created earlier.
# For docker after 17.06-ce:
[Service]
ExecStart=
ExecStart=/usr/bin/dockerd -H fd:// --data-root="/mnt/ebs1"
Restart Docker:
sudo systemctl daemon-reload
sudo systemctl restart docker
The old Docker directory will not be used anymore so you can remove it by:
sudo rm -rf /var/lib/docker
See the Docker installation guide here, if you have any issues.
3. Install & Configure CapRover
First, you need to select the primary domain that will have the deployed web apps on its subdomains. The primary domain itself can be a subdomain. For this example, I will use test.cansin.net as my main domain and the applications will be installed in subdomains such as flaskapp.test.cansin.net.
3.1. Configure the DNS Records
To achieve this, we need to set two DNS records: one for the subdomain and the wildcard for all its second-level subdomains. On Google Domains, these records are set as below, it should be similar to your registrar.

Replace 34.238.245.243 with the public IP address of your EC2 instance and “test” with the subdomain you want to use.
If you want to use your root domain (e.g. example.com) and have the apps be deployed as first-level subdomains (e.g. flaskapp.example.com), then delete “test” to leave it blank (or replace it with example.com depending on registrar) in the first A record and remove “.test” from the second record, only leaving the asterisk symbol (*).
3.2. Install CapRover
Now we are ready to install our PaaS, CapRover. It is just like running any other Docker container:
docker run -p 80:80 -p 443:443 -p 3000:3000 -v /var/run/docker.sock:/var/run/docker.sock -v /captain:/captain caprover/caprover
If the installation is successful, you will see the messages below.

If you are using an existing VPS with a firewall, you will receive an error in this step. If you do, configure your firewall to open the ports we’ve opened on the AWS dashboard in section 1.3. See CapRover install documentation for more information.
3.3. Configure CapRover
Now, we can log in to the CapRover dashboard by navigating to port 3000 of the IP address of our EC2 instance. Use the default password, captain42 to log in.

When logged in, you will see the following form the configure your main domain. Type in your domain, and click “Update Domain” which will redirect you to log in again. When you do, click on “Enable HTTPS”, then “Force HTTPS” to have certbot get you an SSL certificate and renew it as needed.

Then, change the default password from the Settings menu.
3.4. Install Your First App
We’ll start with the One-Click Apps option to spin up a PostgreSQL server. When you select this option on the Apps page, you’ll see a wide selection of applications that are available to be deployed with one click.

Simply, search for PostgreSQL, select it, give it an app name and click on Deploy.

This will create a docker image on your server with PostgreSQL installed.
To import the existing databases of the apps we are migrating, we will need to connect to this database from our local computer. So, we need to map port 5432 of this container to the same port on our host. To do this, go to the Apps page, select the PostgreSQL app we have created, find the Add Port Mapping button and add a rule with 5432 in both boxes as below.

Lastly, click on Save & Update.
We will move a database to this container in section 5.
4. Move Your App to the New Server
In this section, we will deploy this test Flask application and set up a continuous deployment workflow to have it be redeployed with every commit we push to GitHub.
You can follow these same steps if you are deploying your app for the first time.
4.1. Create a GitHub Repo (if one doesn’t exist)
This part will depend on your existing workflow. If you had connected a GitHub repository to your Heroku account for automatic deployment, you can skip this section.
If you don’t already have a repository on GitHub for your project, create one. If you were using Heroku git before, you can just pull from there and push to the new GitHub repository.
4.2. Dockerize Your Python Application (see the end for PHP)
I prefer using a Dockerfile, instead of a CapRover native Captain Definition file, in case I want to use a different container service in the future. Add a file named Dockerfile in the root directory of your repository with the following content.
FROM ubuntu:22.04
RUN apt-get -y update
RUN apt-get install --no-install-recommends -y python3 python3-dev python3-venv python3-pip python3-wheel build-essential libmysqlclient-dev && \
 apt-get clean && rm -rf /var/lib/apt/lists/*
ADD . /my-flask-app
WORKDIR /my-flask-app
RUN pip install -r requirements.txt
EXPOSE 5000

# Ensure that the python outputs are streamed to the terminal
ENV PYTHONUNBUFFERED=1

# Run the app with gunicorn on port 5000 with 4 workers, using gevent worker
CMD ["gunicorn","-b", "0.0.0.0:5000", "-w", "4", "-k", "gevent", "--worker-tmp-dir", "/dev/shm", "wsgi:app"]
Every time CapRover deploys a new instance of your app in a container, Docker will use these instructions to create a new image with Ubuntu 22.04, install python and the dependencies in your requirements.txt, then run the app function from the wsgi.py file with gunicorn.
In your requirements.txt, you will need some version of gevent and and gunicorn. See the requirements.txt of my test app here.
For PHP applications, please see the last section of this post for a sample Dockerfile.
4.3. Create a New Application on CapRover
On the Apps page of CapRover, pick a name for your app and click on Create New App. This name will become the default subdomain of this app (http://flaskapp.test.cansin.net), but you will be able to configure other domains to this app as well.

For this example, we want this app on flaskapp.cansin.net. After adding an A record for flaskapp on our registrar’s website, we click on the app we have just created and type the new domain as below; then click on Connect New Domain.

Then click enable HTTPS , select the Force HTTPS option, type in 5000 in the Container HTTP Port field (unless you selected another port in your Dockerfile), and click Save & Update. This will do the necessary Nginx and certbot configuration automatically though you can add your custom Nginx rules here if needed.
If you need to set environment variables such as database or SMTP credentials, you can enter those on the App Configs page.
4.4. Setting Up the Continuous Deployment Workflow
Now you are ready to deploy your app on the Deployment tab. While you can simply upload files on this tab, this article will describe a workflow that will make your commits pushed to GitHub trigger CapRover to deploy from GitHub automatically.
4.4.1. Authorizing CapRover to Access Your Repository
If you are using a public repository, you can skip this step. If your repository is private, CapRover will need an SSH key to authenticate with GitHub and see your repository. While you can technically paste the SSH key of your GitHub account here, a more secure way would be using deploy keys that only provide access to specific repositories.
Note: As an alternative to using deployment keys, you can instead create a new GitHub user, add it as a collaborator to the repositories you will deploy to CapRover, create SSH keys for that user, and add those keys to that user’s GitHub account. Then you can use that user’s SSH keys for all repositories.
Creating a Deployment Key
Run the following command on your server to create an ssh key. Select a custom name for this key at the next prompt, then hit Enter again to skip setting a passphrase.
ssh-keygen -t ed25519 -C "Caprover Flask Deployment Key"

Add this key to the ssh-agent after starting it with the following commands. Replace flaskApp with the key name you chose in the previous step.
eval "$(ssh-agent -s)"
ssh-add ~/.ssh/flaskApp

Now your public and private keys are created in the ~/.ssh/flaskApp.pub and ~/.ssh/flaskApp files, unless you changed the sample code above. If you selected a different path or file name, change the commands below accordingly.
Adding the Deployment Key to GitHub and CapRover
Run the following command and copy your public key:
cat ~/.ssh/flaskApp.pub
Open your repository page on GitHub, go to Settings → Deploy keys, and click on Add deploy key.

Then add the contents of your public key here and click on Add key.

Next, run the following command and copy your private key:
cat ~/.ssh/flaskApp
Then on CapRover, click on your app and go to the Deployment tab. Under the “Method 3″ section, add your repository URL, branch name, and the private key you have copied (i.e. the contents of your id_rsa file, by default).

Click on Save & Update, then Force Build.
Setting up a GitHub Webhook
After you save your GitHub credentials on CapRover, a URL for the API endpoint will appear above your repository URL. Copy this URL.

Then open your repository page on GitHub, go to Settings → Webhooks, paste this URL to the Payload URL field, and click Add webhook.

Now push a commit to your repository and see the Build Logs on the Deployment tab for your app on CapRover. You should see the success message below.

That’s all. Now every time you push to GitHub, the webhook will trigger CapRover to deploy a new version of your application. If there are any errors, such as missing dependencies, you will be able to see them in the Build Logs section.
5. Migrate a PostgreSQL Database
Our test application in this example uses a PostgreSQL database from Heroku. We will migrate that to the PostgreSQL server we have created in section 3.
5.1. Export from Heroku
The connection string for your database can be found in Settings → Config Vars → DATABASE_URL after selecting your app on Heroku. If you are migrating from another platform, find the database connection string among the environment variables or the settings of your app.
postgres://qzhzootzdkvfdi:19813b61af59c9711899304ccfe2db0cb0c402f317e90754788eb0770ff6aeb9@ec2-54-163-34-107.compute-1.amazonaws.com:5432/db4ejdhq0vnp5r
We can use pgAdmin to connect to that database using the credentials we found. Right-click on a server group and select Register → Server, as below.

Then fill in the credentials from Heroku as below.

There will be many databases on that server, we’ll find the database named in our connection string: db4ejdhq0vnp5r in our case. Then, right-click on it, select Backup, and save the backup file.

5.2. Migrate the Database
Find your new PostgreSQL database credentials on CapRover in the App Configs menu of the PostgreSQL app you have created as below.

You can use pgAdmin to connect to this database using these credentials and the IP address of your EC2 instance, as we did with the database on Heroku. Do not forget to change the host name with the IP or hostname of your EC2 server.

When you connect to the new server, it will appear in the left column. Expand it, and right-click on Login/Group Roles. Then select Create → Login/Group Role as below.

Set the user name in the General tab, set its password in the Definition tab, enable “Can login?” option under the Privileges tab, and click Save.
Now we can create a database for our application by right-clicking on Databases and selecting Create → Database as below.

In the General tab, set the database name, and select the newly created user as the Owner from the dropdown, as below.

If you have a database you want to continue to use, right-click on the database you have created and select restore.

Then select the file you exported from the Heroku PostgreSQL database earlier with the Backup option, then click on the Restore button. Then right-click on the database, select Properties and then the Default Privileges tab. Here ensure that your newly created user has the necessary privileges assigned.
Now, your web application should be able to connect to this new database. Don’t forget to change your application settings to connect it to the new database.
This test app uses hardcoded credentials (that are no longer in use), but you should set them as environment variables at Settings → Config Var on CapRover and have your app read the credentials from the environment variables.
6. Extras
6.1. What about PHP applications?
If your application is stateless, you can follow the same steps to deploy your app except with a different Dockerfile. The example below would put the contents of your repository into the /var/www directory of the container, assuming you want this app in the root directory of that domain.
FROM php:7.3-apache-stretch

COPY . /var/www/html
WORKDIR /var/www/html
EXPOSE 80
6.2. What if my app is not “stateless”?
The continuous deployment workflow is only suited for stateless apps that only do computing. If the files in your repository change as your app runs (e.g. if your application stores uploaded files in a subfolder), then those will be overwritten the next time your app is deployed from the repository. To prevent this, you can deploy your app once and enable the “has persistent data” option for your app on CapRover. Read more about persistent apps on CapRover here.